Showing posts with label Deathly Hallows. Show all posts

Friday, August 12, 2011

Decked Out for Deathly Hallows Mini-Packages

It has now been several weeks since the premier of Harry Potter and the Deathly Hallows Part II.  While organizing the Decked Out for Deathly Hallows Swap on Craftster, I decided to make a few mini-packages as thank you presents for my co-organizers, Pinkleo & Grace. Somehow I have lost the picture of the goodies I sent to pinkleo, who is a fellow Gryffindor, but I do have a shot of the items I sent to Grace, the brainy Ravenclaw.  (Should have thought to ask Pinkleo to take a picture for me when her package arrived!)

Grace's package included a tissue pack for all those sad death scenes, an Excellence bracelet and earrings, Luna's Patronus Charm earrings, a button from the Harry Potter Alliance, a Ravenclaw bottle cap pendant, Deathly Hallows bottle cap magnet, and a Mad-Eye Moody leather bracelet.  Everything was hand made, with the exception of the HPA buttonwhich was purchased on their website, and the Moody bracelet, which was purchased on Ebay.


While I was at it, I also made a mini-package for a wonderful craftster by the name of PirateColey, who defintely exemplifies the qualities of Hufflepuff house.  She is constantly willing to go above and beyond in each swap to make sure her fellow swappers have an excellent experience.  In this swap she even offered to drive to Canada to "smuggle" swap packages into the US during the Canada Post strike!  Her package included a tissue pack, Badger bracelet and earrings, HPA button, Deathly Hallows bottlecap magnet, Hufflepuff House ring (a cute cake topper I found), and a Mad Eye Moody bracelet.

Friday, June 10, 2011

Deathly Hallows Bracelet 2.0

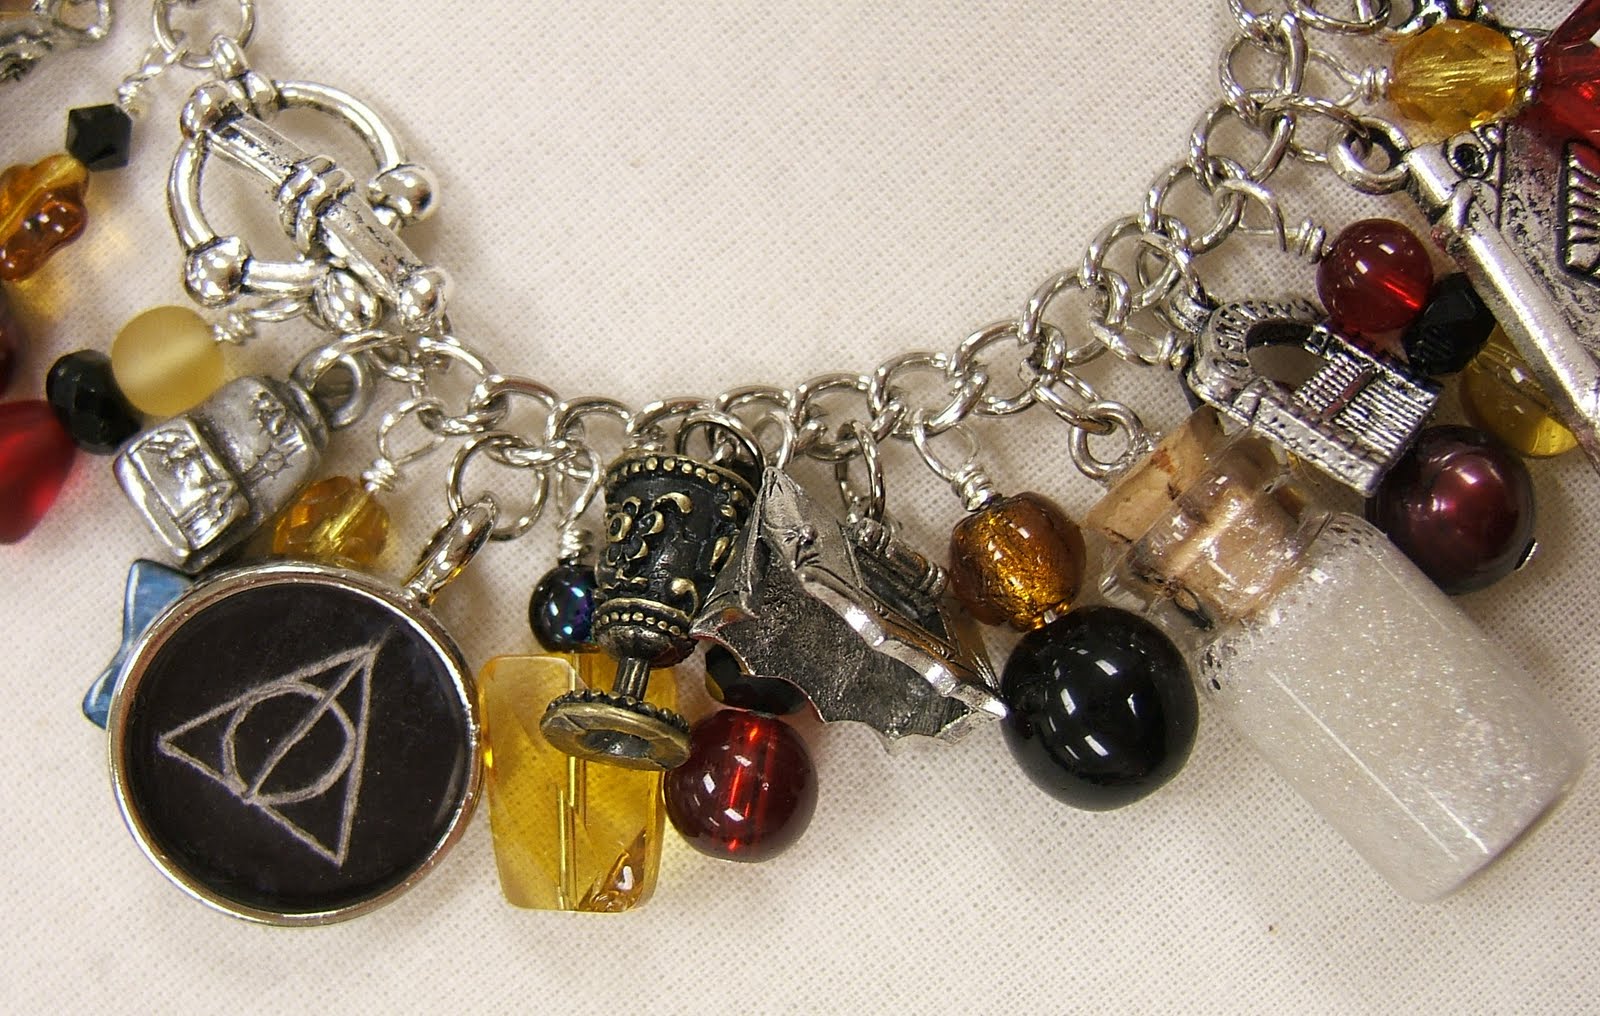
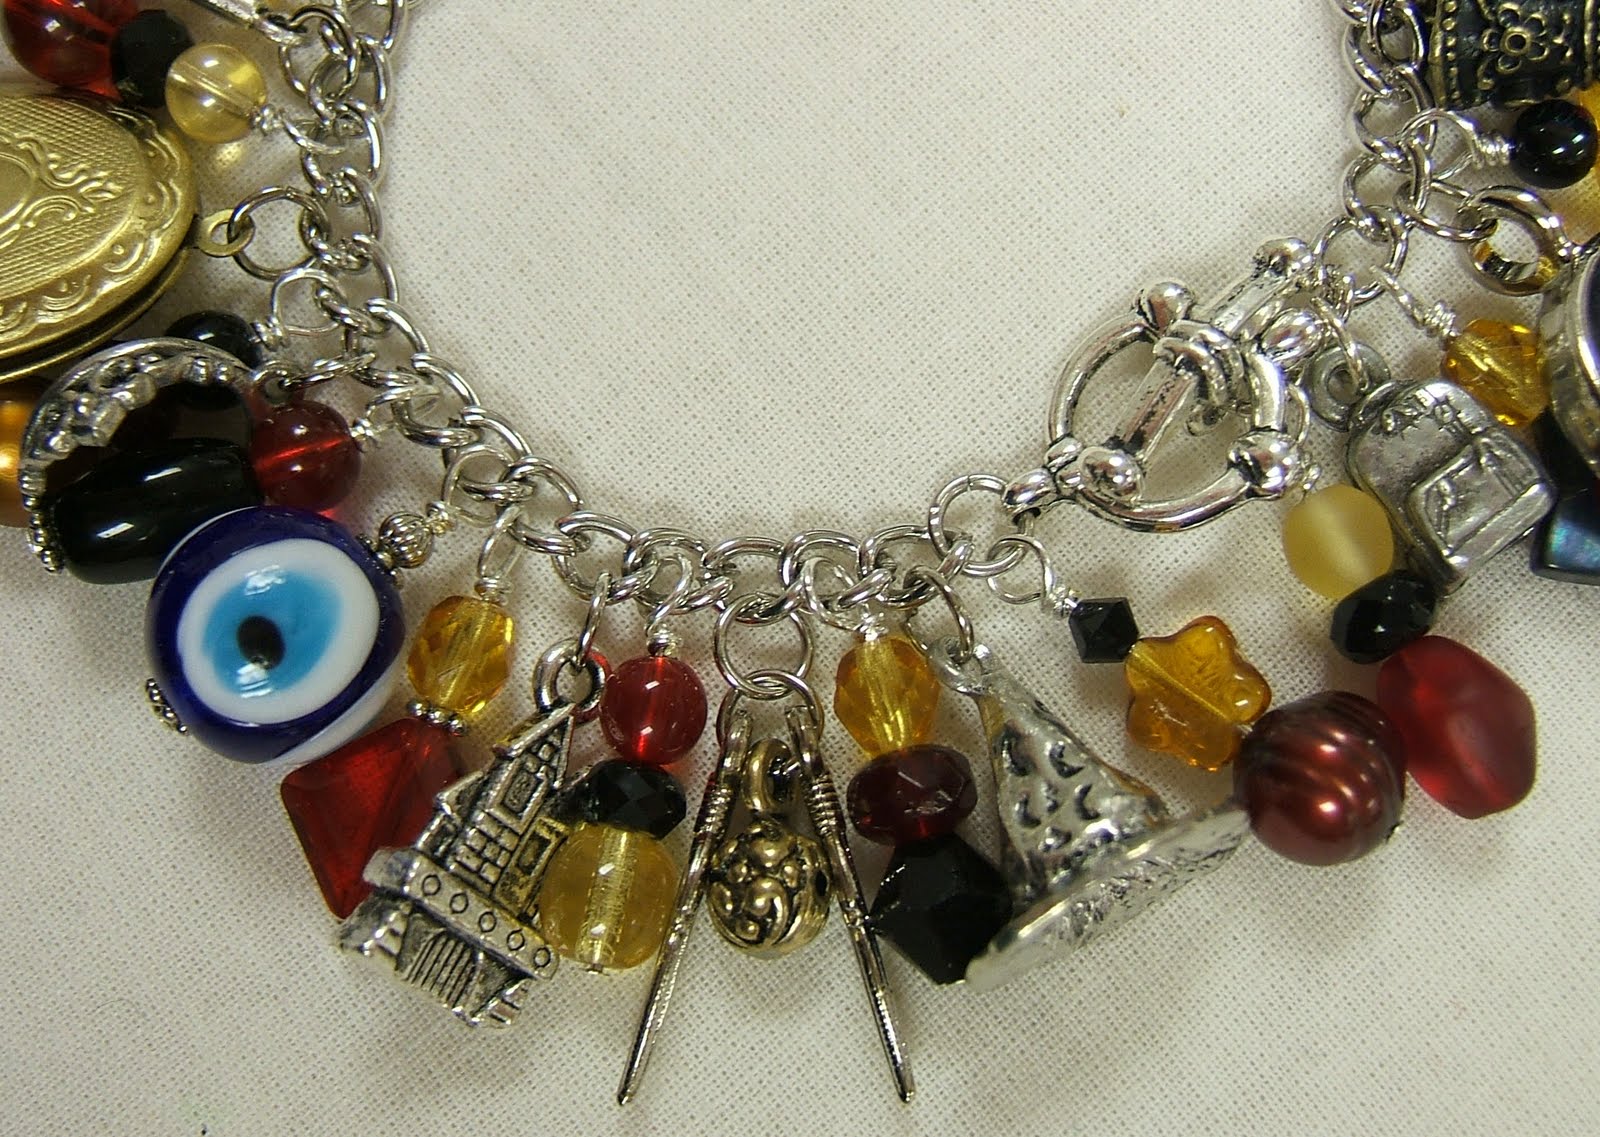
While working on Krafty_Karasu's Deathly Hallows bracelet, I knew I wanted to create one for my Etsy as well.  Version 2.0 varies slightly from the original in terms of the charms within the bracelet, but the concept is the same. 
 It contains 20 charms, in a mix of pewter, Tibetan silver, crystal, brass, and handmade resin filled vials and bezels. The beads are a mix of Druk glass, fire polished Czech glass, and Swarovski crystals, river shell bead frames, and freshwater pearls.

The Charms include:
-Harry's Rucksack
-Deathly Hallows symbol, (handmade charm)
-Helga Hufflepuff's Cup
-the Tent that Harry, Ron & Hermione camp in while on the run
-Vial of Snape's Memories (handmade charm)
-Gate from the Cemetery at Godric's Hollow
-Tales of Beadle the Bard
-Nagini
-The Silver Doe 
-The Elder Wand
-a Crystal from the chandelier at Malfoy manor
-Dragon released from Gringotts
-Lightning Bolt for Harry
 
-Spade that Harry used to dig Dobby's grave
-Slytherin's Locket
-Diadem of Ravenclaw
-Alastor Moody's Glass Eye
-Hogwart's Castle
-Golden Snitch from Harry's first Quidditch Match
-The Sorting Hat 

I'm really pleased with how this one turned out, and quite honestly I'm loath to part with it. I might just have to break down and make one for myself later this summer, after I get some other projects and orders taken care of. 

Tuesday, June 7, 2011

Deathly Hallows Bracelet

Craftster friend Krafty_Karasu recently asked me to create a Harry Potter charm bracelet for her.  Unlike my usual House themed ones, she asked for one designed specifically around the events that take place in Harry Potter and the Deathly Hallows.  I have to say that it was so nice getting to work with a friend on this project.  I started off by coming up with a huge list of possible charms, relating to various moments or objects within the novel.  Then sent the list to Krafty, and asked her to pick out her very favorites.  It took a few weeks to order some of the ones I didn't have on hand, and it took even longer for me to get the resin-cast charms right, but all in all, I'm thrilled with how it turned out.
 
The beads are a mix of glass, foil lined glass, freshwater pearls and Swarovski crystals in shades of scarlet, gold and black.  The color scheme for me actually represents the warm tones used on the cover of the US edition of the novel, and the black helped create a feeling of seriousness that I think is missing in my strictly red & gold Gryffindor bracelets.  

The bracelet is absolutely loaded with charms. I managed to get 19 on there!  The include:
~Mad Eye's glass eye
~the Tales of Beadle the Bard
~the Sorting Hat
~the spade Harry used to dig Dobby's grave
~Helga Hufflepuff's Cup
~vial of Snape's memories (resin filled glass bottle)
~the Silver Doe that led Harry to the Sword of Gryffindor
~Nagini
~the Elder Wand
~the Deathly Hallows symbol, made from a silver bezel filled with resin
~lighting bolt for Harry
~a phoenix for the Order of the Phoenix who fought at the Battle of Hogwarts
~Hogwarts Castle
~Slytherin's locket, the Horcrux that nearly drove Harry and Ron apart
~a thestral

~a broom
~the dragon the Trio released from Gringotts
~vial of Polyjuice Potion used to create the 7 Potters
~the Snitch from Harry's first Quidditch match, which opened to reveal the Resurrection Stone
 Now I just have to cross my fingers and hope it arrives safely, and that Krafty likes it as much as I do!


Saturday, June 4, 2011

Butterbeer Fudge

Recently I saw a listing for Butterbeer Fudge on Etsy and I just knew I had to try making some myself.  In an effort to "get it right the first time", I decided to do several different variations all at once, then have friends taste test them all and report back on the findings.  Below is each of the recipes, and some opinions on flavors.  
Batch #1 on the left, and #3 on the right.  Sadly #3 was gone!
And because I wanted to try out using Craftster's new attachments feature, I also created a PDF of all these recipes on pretty recipe cards.  Download them here: Butterbeer Fudge Recipe Cards.


Batch #1
Prof. Pinkleo's Butterbeeriest Fudge

Ingredients
1-3/4 cups sugar
1 jar (7 oz.) marshmallow creme
3/4 cup evaporated milk
1/4 cup (1/2 stick) butter
1 ½  cups butterscotch Chips
¼ cup white chocolate chips
1 cup chopped walnuts
½  teaspoon vanilla nut & butter extract
½ teaspoon rum extract

Directions
1. Line an 8-inch square pan with foil, extending foil over edges of pan.

2. Combine sugar, marshmallow creme, evaporated milk and butter in heavy 3-quart saucepan. Cook over medium heat, stirring constantly, until mixture comes to full boil; boil and stir 5 minutes.

3. Remove from heat; gradually add the butterscotch and white chocolate chips, ¼ cup at a time, stirring until the chips are completely melted. Stir in nuts and vanilla. Pour into prepared pan; cool.

4. Refrigerate 2 to 3 hours. Remove from pan; place on cutting board. Peel off foil. Cut into squares. Store tightly covered in refrigerator. About 5 dozen pieces or about 2-1/4 pounds candy.

Verdict: This fudge has the most intense butterscotch flavor, and is definitely the softest of the 3 batches.  I personally found the butterscotch flavor a bit too strong when I first tried the fudge.  (I've always pictured Butterbeer as being essentially an ale, with a butterscotch note to it, rather than reminiscent of sundae topping syrup.)  After sitting in the fridge for a few days however, I found the flavor had mellowed considerably.  This was the hands down favorite amongst Pinkleo and her kiddos, and has therefore been named in her honor.  Also important to note that this one melted the most in transit.  So if you are planning on shipping some to a friend, I recommend using one of the next two recipes.


Batch #2
Jennie's Favorite Butterbeer Fudge

Ingredients
1-3/4 cups sugar
1 jar (7 oz.) marshmallow creme
3/4 cup evaporated milk
1/4 cup (1/2 stick) butter
1 cup white chocolate chips
1 cup cutterscotch chips
1 cup chopped macadamia nuts
¾ teaspoon vanilla nut butter extract
¾ teaspoon rum extract

Directions
1. Line 8-inch square pan with foil, extending foil over edges of pan.

2. Combine sugar, marshmallow creme, evaporated milk and butter in heavy 3-quart saucepan. Cook over medium heat, stirring constantly, until mixture comes to a full boil; boil and stir 5 minutes.

3. Remove from heat. Gradually stir in white chocolate and butterscotch chips, ¼ cup at a time, stirring until the chips are completely melted.  Stir in the macadamia nuts. Stir in the vanilla nut butter and rum extracts. Pour into prepared pan; cool until set.

4. Remove from pan; place on cutting board. Peel off foil. Cut into squares. Store tightly covered in cool, dry place. About 5 dozen pieces or 2-1/4 pounds candy.

Verdict: This is my personal favorite of the three recipes.  It has a milder butterscotch flavor than batch one, due to the inclusion of a higher ratio of white chocolate chips.  It is sweet and mild, with a vanilla-nut-butter topnote, and a butterscotch finish.  This is also a firmer fudge, which feels almost "al dente" when you bite into it.  The macadamia nuts are definitely great in this.  Their mild flavor doesn't compete with the butterscotch the same way the walnuts did in batch #1, but their crunch is lovely.  It held it's shape better in shipping than batch #1, but if you are thinking of mailing it, I'd either wait till cooler weather or go for batch #3.


Batch #3
Gratia's Grownup Butterbeer Fudge

Ingredients
Fudge
1 cup Butterscotch Chips
1 cup  White Chocolate Chips
2/3 cup sweetened condensed milk (not evaporated milk)
1 cup chopped walnuts
½ teaspoon vanilla nut butter extract
½ tsp rum extract
Topping
1 cup White Chocolate Chips
⅓ cup sweetened condensed milk
½ tsp vanilla nut butter extract

Directions
1. Line 8-inch square pan with foil, extending foil over edges of pan.

2. Melt white chocolate and butterscotch chips with sweetened condensed milk in medium saucepan over very low heat, stirring constantly, until mixture is smooth.  (If doing this with children, you can also do this step in the microwave.  Set it to medium and start with a 30 second heating.  Then do 10 or 15 second bursts, stopping to stir each time.)

3. Remove from heat. Stir in walnuts, as well as vanilla nut butter & rum extracts. Spread into prepared pan.

4. Meanwhile, place 1 cup white chocolate chips and ⅓ cup condensed milk in a microwave safe bowl.  Microwave on MEDIUM for 30 seconds, stir.  Continue microwaving at 10 second intervals, stirring between each, until chips are completely melted. Stir in vanilla nut butter extract.

5. Pour mixture over fudge, in light ribbons, trying to spread it out as evenly as possible.  You want a thin and even top layer that covers the whole pan.

6. Cover; refrigerate 2 hours or until firm. Use foil to lift fudge out of pan; peel off foil. Cut fudge into squares. About 3 dozen pieces or 1-1/2 pounds fudge.

Verdict: This batch is the firmest of the three, and held it's shape in shipment surprisingly well. The top layer of white chocolate looks like the foamy head on the top of a glass of freshly poured butterbeer, which is a definite plus.  It also has the added benefit of being able to be made totally in the microwave, and therefore safer for kids & teens to make on their own.  The cute top layer however made this batch a little to heavily vanilla for me.  If I were to repeat this recipe, I would probably tweak it so as to add more butterscotch chips and less vanilla in the main portion of the fudge (maybe 1 1/2 cups butterscotch & 1/2 cup white chocolate) so that the vanilla on top would be more of a contrast.  That however, would probably also make the fudge itself softer, and more melty when shipping.

Finally a note about batch #3's name:  Good friend, former student, and swap co-organizer Ex_Gratia has just graduated and gotten her first full-time professional job working at Louisville Ballet!  Since the top layer of the fudge made it resemble a real beer, I thought it appropriate to name it after my now "grownup" friend.

NOTE: For best results, do not double ANY of these recipes.