In the mean time, a couple people in the swap asked for a tutorial on how I made my bookmarks. And since a tutorial isn't much help without the corresponding pattern pieces, here goes the tutorial and a free template!
Ingredients:

Golden Snitch & Sonic Screwdriver Template (GS & SS refer to which bookmark each supply is used in)

 Finally, using your exacto knife, cut out the last little windows at the back end of the screwdriver, and sketch around them with your black pencil. Sadly, I forgot to get a picture of this step. Scroll down to see the finished and laminated bookmarks, where the back end cutouts are visible.
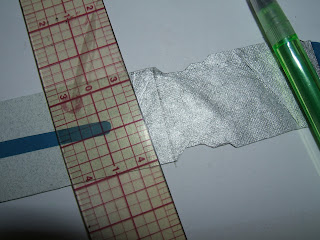
 Let's give the wings some definition. Start by sketching a "vein" along the top and down the inside edge of the wing with pencil. I just free handed these. Once you have a shape you like, go over it in Sharpie, and erase any unnecessary pencil lines. Now, take a small see-through ruler, and starting at the wide end of the wing, make hatch marks every 1/8" to the end of the wing, stopping just before the very bottom edge. Now that your wing has definition, it needs some shading. I shaded just under the top of the wing, and slightly along the sides, with a black colored pencil.
 Repeat on the other wing.

 Flip it over and trim away any excess with your craft knife.
 I chose to make my Snitch a bit fancy by applying some gold leaf. I used a gold leafing pen that I found at Hobby Lobby. You simply draw with the adhesive pen, (much like a paint pen), then let it sit for 5 minutes to get tacky. Once the glue is ready, you apply your gold leaf. When you pull the backing paper away, you will have a messy blob of gold leaf stuck to your Snitch.
 Not to worry! Gently brush off any excess with a soft paint brush.
 It should now look something like this:
 After the gold leaf is applied, glue the Snitch top onto the body, centering your designs as necessary. Now for the laminating! (My apologies, I missed getting a picture at this point. Though it looks exactly like the picture below.)
***Update: I've also been asked about the plain bookmarks, and what I use to create them. I've had an old Daniel Merriam calendar laying around since 2008, that was just to pretty to throw away. Instead, I take the images, coat the back with a good coat of rubber cement, and plop them down on the smoother side of a piece of cardstock in a corresponding color. (Note, rubber cement works MUCH better than archival glue in this instance!)
When they are dry, I slice them up on my paper cutter into various bookmark sizes. Usually about 2" x 8", though I do make some bigger and smaller depending on the image I'm cutting up. At this point the bookmarks can be used as is. The rubber cement keeps them together rather well. I have a few I've been using at least 2 years and there is no separating between the layers. If desired, pop a hole in the top and thread some scraps of ribbon or yarn through them like this one.***

 Once it's all warmed up, go ahead and feed your sheet of bookmarks through it. Take care to feed them nice and evenly so that they don't end up in a jam.


gold metallic paper/cardstock (GS)
silver metallic paper/cardstock (GS & SS)
blue paper (SS)
grey granite/crackled looking paper (SS)
rubber cement or archival safe glue (GS & SS)
see-thru ruler with 1/8" marks (GS)
fine point Sharpie (GS)
black colored pencil for shading (GS & SS)
gold leaf or a gold paint pen (GS)
laminator (GS & SS)
Print out the bookmark templates, preferably on cardstock. Cut out the desired pieces and trace them onto the corresponding paper colors listed on the template.
**Where ever possible, I would recommend using metallic paper rather than cardstock. The reason for this comes in during the laminating process. If they finished bookmarks are too thick the laminator can't seal all the way around them, leaving small gaps in the plastic. I helped allieviate this by running mine through the laminator twice and cutting with a wide edge of plastic all the way around, but making them thinner would avoid this problem all together.**
Now let's put them together!
Let's start with the Sonic Screwdriver bookmark first.
Cut out all your pieces. Before we go any further, see those two "T" shaped pieces? You won't need them. Go ahead and toss them now. My bad.

Now, let's start with the screwdriver's handle. Take the blue rectangle and the grey handle piece that has a long thin oval cut out of it. Working from the side with the pencil lines on it, glue the blue down so that it fills the long oval window. Trim off any excess paper with your Exacto knife if necessary.
 Flip the handle piece over and glue it to the silver body of the screwdriver, matching the grooved shapes at the front of the handle.
 Next, take your knife and trim away any excess bits of paper visible from the other side of the bookmark. We will be doing this step after we add on each of the next few pieces.
 Place your blue circle at behind the end of the screwdriver, till you find how much of the circle you'd like to have showing. Lightly draw along the silver edge on the blue paper. Leaving a scant 1/8" beyond that line for gluing, cut away the extra part of the circle. Apply a very small amount of glue to the end of the blue circle, and attach it from the back, to the silver body of the screwdriver.


Go ahead and glue on the tips of the screwdriver. One to the front and one to the back. Again, trimming away excess paper with your craft knife between each step.


Now our screwdrivers need some definition. Take a pencil and a small ruler, and begin drawing straight lines between all the body segments. Go over these with a fine point Sharpie.
 After you get the main lines sketched out, you can go back with your colored pencil, and add some more shadow to give the bookmark more dimensionality. I colored every other segment in, and used rounded shadows on the other areas. I also dragged my colored pencil along all the sides of the bookmark, both to give definition, and to hide the very boring looking cut edges. Don't forget to shade around the blue window!
 Step back and take a look at your screwdriver. Give it any last minute shading or definition that you wish.


Now let's make the Golden Snitch!
Start by cutting out your pieces. One body, and 2 circles for the front & back.


Next apply glue to one of the gold circles. Attach it to the silver body of the snitch, being careful to line up your circles.


***Update: I've also been asked about the plain bookmarks, and what I use to create them. I've had an old Daniel Merriam calendar laying around since 2008, that was just to pretty to throw away. Instead, I take the images, coat the back with a good coat of rubber cement, and plop them down on the smoother side of a piece of cardstock in a corresponding color. (Note, rubber cement works MUCH better than archival glue in this instance!)
When they are dry, I slice them up on my paper cutter into various bookmark sizes. Usually about 2" x 8", though I do make some bigger and smaller depending on the image I'm cutting up. At this point the bookmarks can be used as is. The rubber cement keeps them together rather well. I have a few I've been using at least 2 years and there is no separating between the layers. If desired, pop a hole in the top and thread some scraps of ribbon or yarn through them like this one.***

Let's Laminate!
Plug in and turn on your laminator. Mine takes a while to heat up, so while it's working, you can start arranging your new bookmarks in a laminating pouch. I usually get 4-5 in each 81/2" x 11" pouch.

Once they have cooled down, cut out your new bookmarks. Make sure to round off any corners, so they don't poke or scratch you next time you cuddle up with your favorite book!

If you don't own a laminator, you have a few options. #1, You can buy one. They aren't expensive and come in really handy. Mine was $19 at Aldi. #2, You can take your bookmarks to Kinko's, Office Max, Staples, etc., and they will be happy to laminate them for you. It is also not very expensive. About $1-2 per 8 1/2"x11" sheet. Or, #3, You can get a similar effect by using packing tape, though it is less sturdy. I like the "HD" Packing Tape that is made by Duck. It is SUPER clear, without any of that grime you find on regular packing tape. (I have used it to great success in making resin-filled bottle cap pendants as well and you can't even tell it's there.) I found rolls Walmart for a few dollars.


thanks soooo much for the tutorial!!! off to buy supplies....
ReplyDeleteYou are so very welcome dear! Oh, and I would recommend using paper rather than cardstock where ever possible. If the finished bookmark is too thick, the laminator will have a hard time sealing around it and you'll end up with little gappy bits. I ran mine through the laminator twice then gave a wide cut around the shapes, and it seemed to help some of the gaps, but if I had thinner paper I definitely would have gone with that.
ReplyDelete